
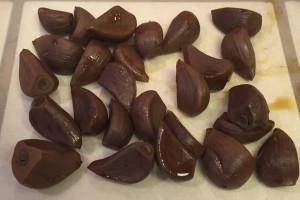
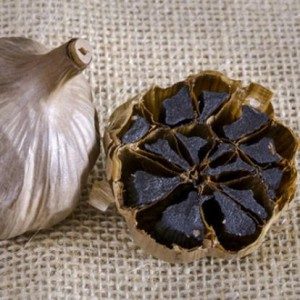
Thanks to the folks at Bar Tartine, in San Francisco, I had to try making black garlic. Black garlic, according to Nicolaus & Cortney, is black as tar and has lost all of the sharpness and has a molasses-like sweetness and a slight anise aroma. They also use black garlic dried, in a powder form, to add complexity to various dishes.
Black Garlic by Bar Tartine
Ingredients
- Heads of garlic
Instructions
- Hold the whole, unpeeled garlic heads at a constant temperature of 130 degrees F for 2 to 3 weeks until the garlic is soft and black as tar.
- Store the blackened garlic in an airtight container at room temperature for a month, or in the refrigerator for 3-6 months.
- Optionally, dry the black garlic by peeling the cloves, then slicing thinly. Dehydrate at 125 deg F until brittle, about 12 hours. Grind the dried slices into coarse flakes, then return to the dehydrator for another 8-12 hours - you want the flakes to powder without clumping when ground.
- Store black garlic powder in an airtight container in a cool, dark spot.
Notes
Other ways they suggest to "cook" the garlic is a food dehydrator or a rice warmer, but if using the dehydrator, make sure to securely wrap the head in plastic wrap then foil to keep them from drying out. Adapted from Bar Tartine Techniques & Recipes
Black Garlic by Evan Hanczor
Ingredients
- Garlic - whole unpeeled heads (as many as you can fit into pan)
- Damp hay or similar material (optional)
- Food dehydrator
- Pan - a third pan or half-hotel pan
- Plastic wrap
Instructions
- Take some whole heads of garlic - as many as you'd like, but since this recipe takes a while I'd recommend doing as many as possible.
- Put them in the pan and cover the container all around in a few layers of plastic wrap, to ensure no moisture can escape.
- Add a little damp hay or similar material before wrapping, to help prevent the garlic from drying out.
- Once the container is completely sealed with plastic wrap, cover once with a layer of foil. Set your dehydrator to 140 degrees F. If you have multiple shelves in the dehydrator, set your black garlic on the bottom shelf. Feel free to use the dehydrator, if space allows, for other purposes while the black garlic is working.
- Be prepared for the wait! The author has found the process to take between 26-35 days, depending on how often the dehydrator is used for other projects, the size of the bulbs, and the moisture content. A noticeable color change may not begin to occur until 15-18 or so days into the process, so don't worry if nothing seems to be happening.
- You'll know the garlic is ready by its deeply browned color and sweet, captivating aroma when you unwrap the container.
- Store the black garlic in an airtight container until using, and be sure to throw the garlic skins into stocks, soups, and sauces to utilize their flavor as well.
Notes
Since my slow cooker wasn’t quite cutout for the job of making black garlic, I purchased an instant pot to try again. Turns out that the Instant Pot is awesome for more than making black garlic! I bought the smart one that can be controlled from my iPhone. It’s well-worth the expense and space of having yet another kitchen gadget. Rice, stock, slow-cooking, yogurt, and pressure-cooking are all done in this thing.


How do you manage to fit the plastic then foil wrapped whole garlic bulbs on the shelves of the dehydrator?? There isn’t enough room height wise to accommodate them.
Hi Lori,
My dehydrator has shelves that come out completely, so I would just remove enough shelves above your shelf of garlic to make room.
I just tired this using Bar Tartine’s instructions (I have the book) and a slow cooker on warm. 2 wks. My resulting black garlic cloves are dry and hard. I’m going to turn them in to black garlic powder! However, I feel this was a fail. Bar Tartine for some reason does NOT suggest wrapping the garlic in this method. I’m not sure why. Anyway, I’m really interested in the canning jar/water in the slow cooker method I see here. Will try that next! Thanks for this!
I solved the cost problem by building a wooden box out of two layers of one inch cedar fence boards and powering it with one 25 watt light-bulb. The inside box dimensions are 14″ by 71/2″ by 6″ and holds four 500 ml jars (plus the light). I drilled a small hole through one of the walls, placed a meat thermometer stem through it, and to my pleasant surprise read 160 F.
For humidity, I add small side-walk rocks (a small inch) at the bottom of each jar, add water to just cover the rocks, loosely wrap a garlic head in tin-foil to keep it from touching the water and screw on the lid finger tight. 18 days later out comes soft, sweet black garlic!
With Love, Vello
How did you do it in the instapot? I can’t find settings anywhere online but saw a chef mention it could be done in 6 hours.
Looking for instruction that a chef mentioned – use an instant pot to process black garlic in six hours.
I really wish they would have included the HOW TO of using the instant pot!!
I doubt 6 hours would be enough to get black garlic. In 6 hours your garlic will turn darker but it will not be black garlic. By the same token I see people leaving them in garlic fermenters for 40 days.. that is too long if you ask me. I like my black garlic soft, smearable and sweet. I used a rice cooker set on warm for 9 days and achieved what I wanted. I wrapped each garlic head in parchment paper then tightly in tin foil. This keeps the moisture in each packet and keeps the garlic from drying out and getting bitter. As the garlic stays in the cooker longer, the flavor gets less sweet. It’s a personal decision when to take it out. Experiment!